GRID 30 Single Wall Mount Pergola Kit for 4x4 Wood Posts
Extend your home into your outdoor space. Just mount the SOLO 30 brackets to your home or cottage wall and connect them into the TRIO 30 brackets. This option provides you with an A-frame pergola structure that will add to your outdoor oasis.
PLEASE READ
The GRID 30 Collection was designed and developed to allow you to build an angled and peaked roof pergola. GRID 30 brackets are not structural brackets or intended to have fixed roofs, customization or anything outside the intended and indicated use of pergola as shown, we advise consulting with an engineer as well as our ’Structures’ page. . For anything outside our recommendation, we advise consulting with an engineer. Always check your local building codes, HOA, and municipal requirements in advance of building as they vary by city/state and region. Please ensure you read through the "Instructions" thoroughly before beginning construction on this build.
Toja Tip: Ensure lumber is fully inserted into the bracket cavity, resting on metal tabs for proper installation.
Please note: Before mounting anything to your home or cottage, we advise consulting your local building code(s). Anchoring hardware NOT included.

Angled Roof Calculator for 4x4 Lumber
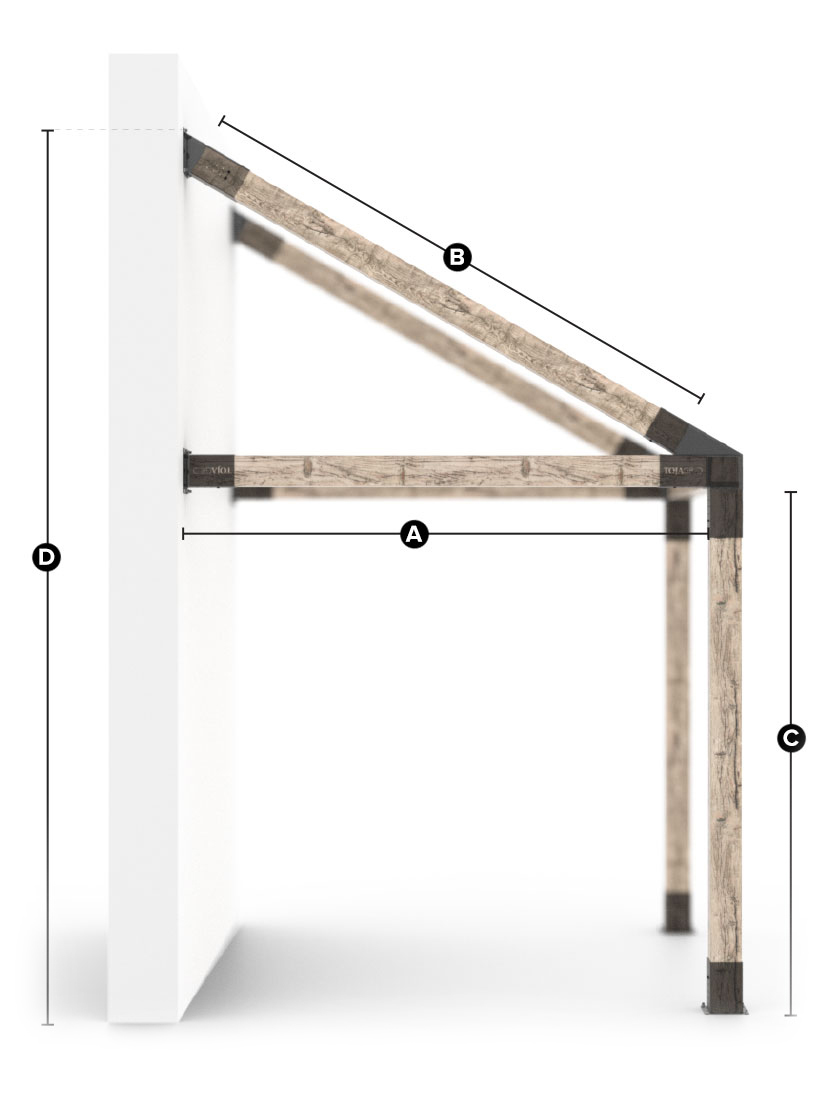
Take advantage of this lumber calculator to help guide you with your angled roof pergola build from the GRID 30 Collection. Just enter the length/span of lumber (A) to determine the length/span for lumber required for peaked roof (B). Enter the length of lumber (C) to determine the total overall height (D) of your build.
Included
INCLUDED
- 1x TRIO 30 Left
- 1x TRIO 30 Right
- 2x SOLO 30
- 4x SOLO
- #12 x 1-1/2” Pan Rob/Phil combo drive 304 S.S Wood screws with Black plastic head caps
NOT INCLUDED
- Wood
Shipping wood is costly. Most of the population has access to stores that sell wood locally where they live. Buying your lumber allows you the freedom to select the type of wood you want to use for your build and budget. There are also regional limitations for what kind of lumber is ideal for your build; different species of lumber would be used in tropical climate vs. a cold one. - Anchoring Hardware
Due to different building materials and requirements based on location, we advise on checking building codes and talking to your local hardware store for the best securing hardware for your specific surface.
Tips
TIPS
GENERAL
WOOD
SCREWS
- Each bracket only requires 2 screws per each side/set of eight holes.
- Insert screws in holes closest to the wood.
- Hardware to secure to wood is included.
- Additional screws are available for purchase
Instructions
SINGLE GRID 30 WALL MOUNT PERGOLA BUILD
what you need
Ladder(s)
Drill(s)
Measuring Tape
6-8 People (A mechanical lift is also recommended for this build)
Cardboard (to be placed under the brackets to not scratch your surface or the brackets)
LUMBER
When purchasing your lumber, always take a bracket with you to ensure a proper fit.
You can select whatever lumber suits your style and budget. It must be dry and straight.
Brackets use dressed lumber.
4”x4” (3.5”x3.5”) Bracket Cavity is 3.61”x3.61”
6”x6” (5.5”x5.5”) Bracket Cavity is 5.62”x5.62”
SCREWS
Each bracket only requires 2 screws per each side/set of eight holes.
1-1/2” Pan Rob/Phil combo drive 304 S.S Wood screws with Black plastic head caps are included
Insert screws in holes closest to the wood.
Hardware to secure to wood is included.
Additional screws are available for purchase.

SECTION 1 BUILDING THE TOP
Insert your lumber into the first side of the TRIO 30 Left and Right brackets.
Attach the lumber to the first angled TRIO 30. Unsure on cut size? Use our ONLINE CALCULATOR

SECTION 2 BUILDING THE TOP
Attach the SOLO wall mount brackets to the ends of the straight pieces of wood.
Attach the SOLO 30 brackets to the ends of the angled pieces of wood

SECTION 3 INSERT THE POSTS
Insert your vertical posts.
Secure bracket to lumber with provided screws.

SECTION 4 COMPLETE
Carefully walk your pergola up the wall.
Level and anchor your wall mounted SOLO and SOLO 30 brackets to the wall.
Anchor your ground SOLO brackets to your surface.
Remember Anchoring hardware is NOT included as surfaces will vary from build to build. A local building supply retailer will be a helpful resource.


